Background
If you find this free trail guide useful, please provide payment by picking up at least one piece of litter on your hike. Cha-ching! Thanks for being awesome! (And here’s a quick primer on Leave No Trace, too, to help us keep the trails nice and fresh for each other.)
**FIVE-ALARM, ATOMIC-WEDGIE UPDATE – posted April 2025** The Breakneck Ridge trailhead detailed in this trail guide is closed for construction as of April 21, 2025, and is expected to remain closed for TWO YEARS. You can find more details on the trail closure at www.breakneck.info. You can also find some cool details on the Hudson Highlands Fjord Trail (that is being built during this closure) on the Fjord Trail’s Breakneck Connector and Bridge page. I look forward to updating this trail guide again when the construction is complete (hopefully from the comfort of my flying car, which should definitely be a thing by 2027, right?). Until then, happy hiking elsewhere!
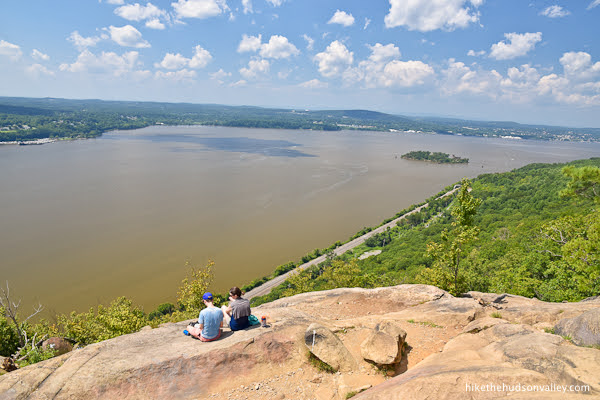
Background you can feel free to skip: The view from the flagpole partway up Breakneck Ridge is one of the most famous vistas in the Hudson Valley, and for good reason.
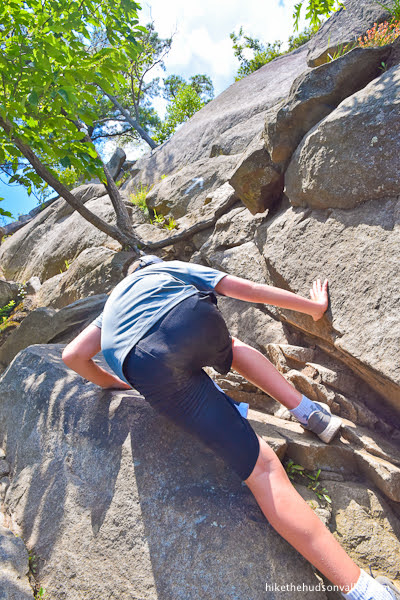
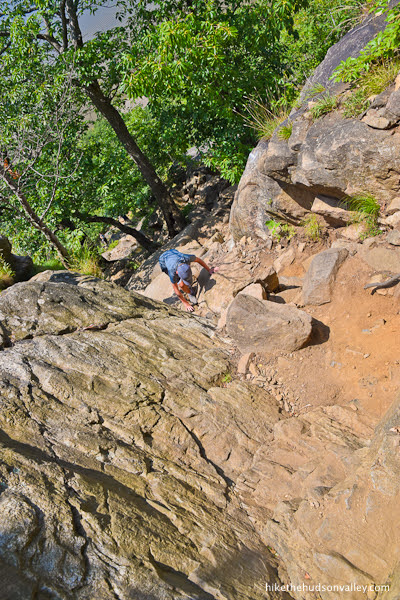
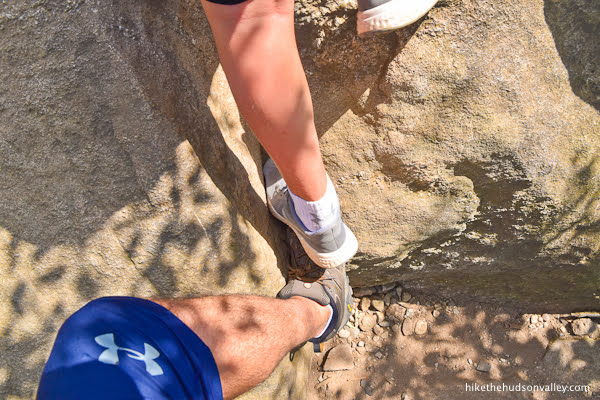
It’s a fantastic, panoramic view that immediately rewards you for scaling the vertical insanity of the Breakneck Ridge Trail, which is basically a rocky elevator shaft, requiring equal parts feet and hands to ascend.

Until 2021, the Breakneck Ridge Trail, in all its rock-scrambly glory, was the only way to reach this awesome spot.


Thanks to an amazing collaboration involving many awesome local groups and volunteers (called out by name in this great article from NYS Parks), and the trail-building expertise (and backbreaking manual labor) provided by Tahawus Trails LLC and the Jolly Rovers Trail Crew, hikers now have a fantastic, not-quite-so-vertical alternative to reach this panoramic view: the Nimham Trail.
With the addition of the Nimham Trail (opened to the public in 2021) to Breakneck Ridge, you can now get to the flagpole by simply climbing a million stone steps.
Okay, it’s actually more like 500 stone steps, but the distinction between a million and 500 probably starts to blur after the first 300 or so.
I say “probably” because my twelve-year-old son and I never climbed the stairs. (Though we did descend them!)
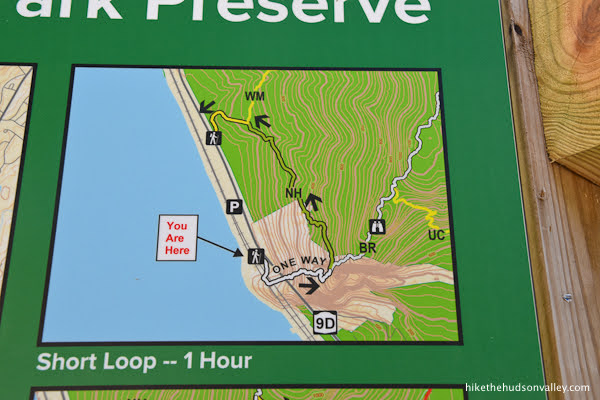
We chose to do this hike as a loop, climbing up the rocky elevator shaft of the Breakneck Ridge Trail, and then descending via the new (and awesome!) Nimham Trail. This version of the hike is officially known as the “Short Loop,” and is shown as one of the options on the signage at the trailhead.

The official estimate for this hike is one hour, as posted on the sign. While it is POSSIBLE to do this hike in one hour, you’d have to be seriously hustling. It took us an hour and fifteen minutes, and we were hurrying. Ninety minutes feels like a more comfortable estimate to me, to allow plenty of time for soaking in the views and/or gasping for breath. You’ll be doing lots of both.
If you prefer to skip the insanely steep rock scramble, you can choose to do this hike as an up-and-back affair, using the relatively tame Nimham Trail both ways. That seems a little like going to Six Flags and just riding the carousel all day, but hey, roller coasters aren’t for everyone! (Also, Breakneck Ridge would be a pretty good name for a roller coaster, wouldn’t it?)
But don’t expect the Nimham Trail to be an easy ride, either – while those million steps offer a much gentler alternative to the rock scramble on the Breakneck Ridge Trail, there’s just no avoiding the ascent of approx. 650 vertical feet to get to the flagpole. Gotta gain that altitude somehow!
Prior to the creation of the Nimham Trail, the standard loop hike at Breakneck Ridge (shown as the 3-hour “Long Loop” on the trailhead sign) traversed 3.7 miles and took about 3-4 hours. Good news: it still does all those things! If you’d prefer to make your day at Breakneck longer, and want to take in some of the views from further up the ridge (the views do get bigger up there, by virtue of the 800 additional vertical feet), that hike is also a wonderful option.
My trail guide for that longer hike, originally titled “Breakneck Ridge,” is now renamed “Breakneck Ridge: Long Loop” to match the official signs.

It’s good to have options in life! And the Nimham Trail gives you a couple of great ones that weren’t available here prior to 2021.
Whichever option you decide to take, if you’re up for a strenuous climb to some gorgeous views, you’ll be hard-pressed to find a better choice than Breakneck Ridge.
Other points worth mentioning:
– The rock scramble from the trailhead to the flagpole on the Breakneck Ridge Trail is now one-way (up!) only. To descend, you must take either the Nimham Trail or do the Long Loop.
– The spellings “Ninham” and “Nimham” are often used interchangeably. (I also encountered this issue when writing the trail guide for Ninham Mountain, 40 minutes east of Breakneck in Kent, NY.)
The NYS Parks press release for the opening of the trail calls it the “Ninham Trail.” This lengthier article from NYS Parks also says “Ninham Trail,” and offers this context on its namesake:
“…Daniel Ninham, who was the last chief of the Wappinger tribe that once lived in the rocky Hudson Highlands of Westchester, Dutchess, and Putnam counties. (His last name has also been spelled Nimham, based on the historical record, but the preferred spelling is Ninham.)”
While I would rather use the preferred spelling of “Ninham,” I have used “Nimham” in this trail guide to match the trail signage, which uniformly uses “Nimham.” (You’re more likely to be looking at the trail signs than online articles while you’re hiking, so that felt like the right tiebreaker to use.)
– Was it just me, or is everyone super friendly on this trail? On the day we visited, people were saying hello, taking pictures for each other, running around trying to locate the owner of a dropped AirPod, and just generally being awesome. Hikers are always awesome, of course, but this felt like more than usual. Maybe it’s like hell week, or boot camp, where people going through a harrowing ordeal together become closer?
– By some accounts, Breakneck Ridge is THE most popular hiking destination in North America, with over 100,000 visitors annually. Many of those visits are packed into the same weekend-afternoon timeframe. I highly recommend that you visit on a weekday or other off-peak time – it’s much more pleasant to move at your own pace up the rock scramble, without tailgating slower hikers or being tailgated by quicker ones (not to mention ease of parking). Of course, everyone is so nice here, maybe you want their company! Otherwise, try to visit at a time other than a nice weekend day.
– Pro tip (from an amateur): If smaller hikers in your group are having a hard time ascending some of the steep spots that require a longer reach, you can use your foot as a backcountry step stool. We found this technique useful in a couple of spots.
– Here’s a snippet from my original Breakneck Ridge trail guide that’s worth pasting here: A friendly first responder reached out to me with this message: “Our local volunteer first responders do a lot of rescues at Breakneck. Amazing how ill-prepared some folks are when they attempt any outdoor adventure.” She recommends that everyone review this list before attempting this hike. Good advice! Let’s make sure your day at Breakneck is memorable for the right reasons.
Trail Guide
Bonus unsolicited advice: Don't depend on having cell service in the woods - it can be spotty out there! Download this trail guide to your phone before you head out. (It's easy to do on iPhone and Android.) May your connection to nature be strong, even when your connection to the internet is weak.
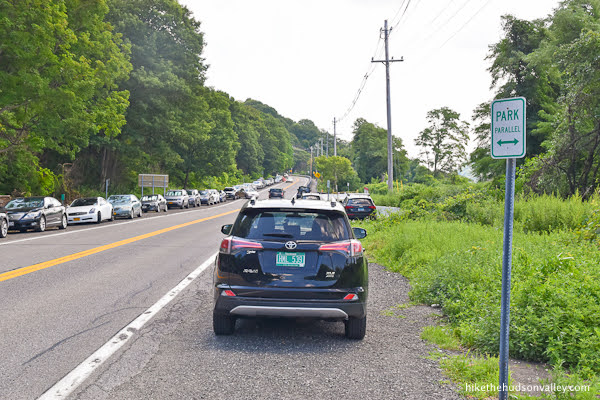
1. From the parallel parking along Route 9D between the tunnel and the yellow-blazed Wilkinson Memorial trailhead to the north of the tunnel (see “Directions to the trailhead” below), carefully walk along 9D south, toward the tunnel (and Cold Spring beyond).
Traffic moves swiftly through this area – do your best to stay off the road where possible. The wide shoulder usually offers enough room to allow hikers to pass on the safe side of parked cars.

As you get closer to the tunnel, you can put a guard rail between you and traffic. Thanks, guard rail!
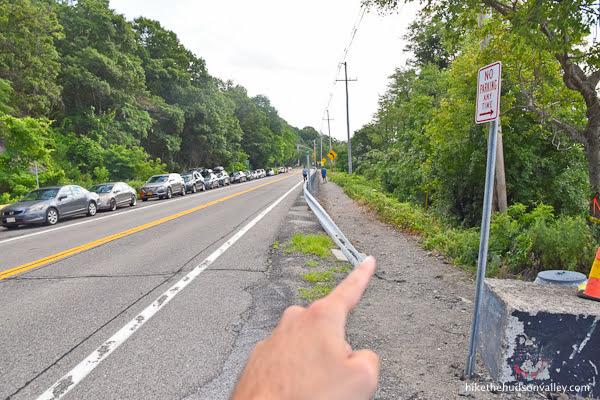
And thank you, sign that encourages drivers not to run over us!

In just another minute, you’ll arrive at your destination: the porto-pottie-festooned trailhead for Breakneck Ridge. Whether nature is calling you up the mountain, or just calling, this is the place to answer the call.
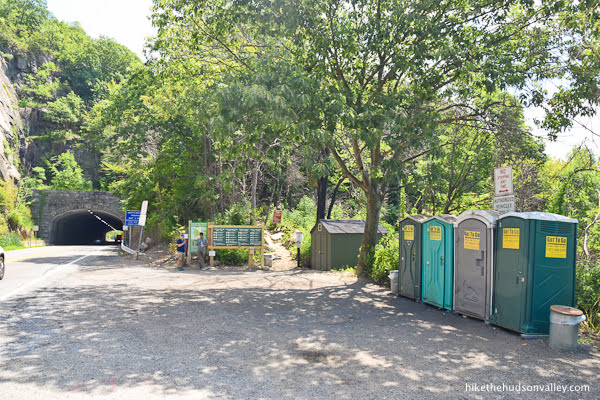
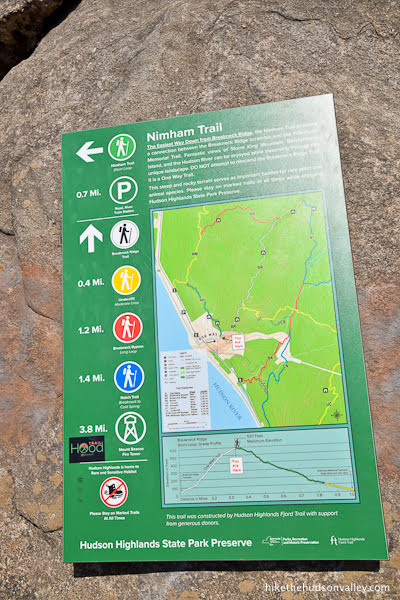
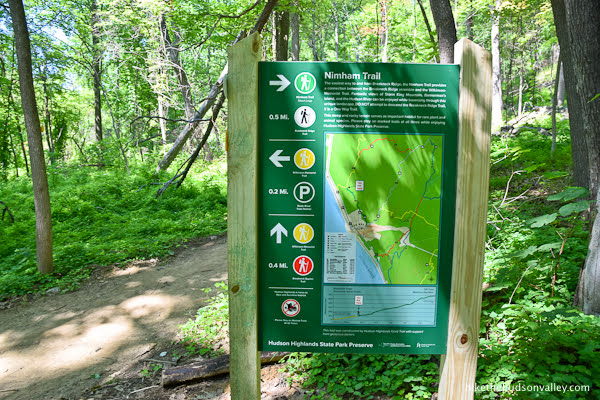
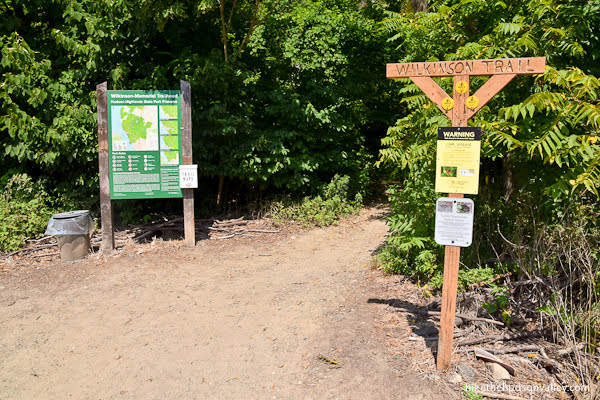
2. Take a moment to check out the copious, helpful signage.

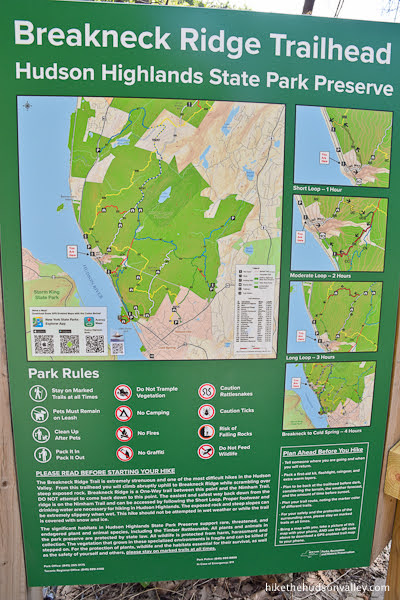
You know, all you really need to complete a Breakneck hike is the information on this sign. Take a picture (as the sign suggests), and you’re all set! But since we’re both here, I’ll keep writing this trail guide anyway. Seems rude not to.
Short Loop, here we come!
3. Just to the right of those signs, you’ll see the trailhead. Let’s do this thing!
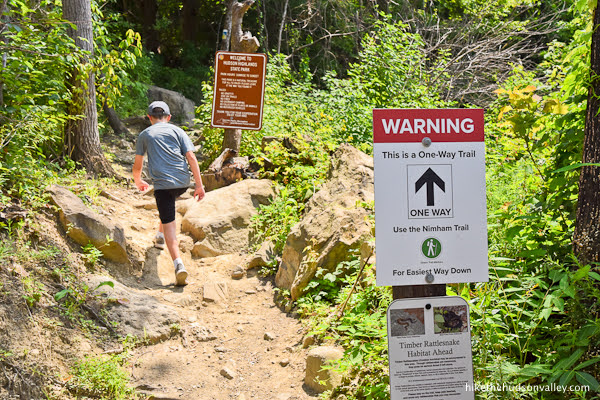
Oh, look, this is timber rattlesnake habitat! How interesting! Also, how come nobody mentioned this earlier? We could have gone bowling instead.
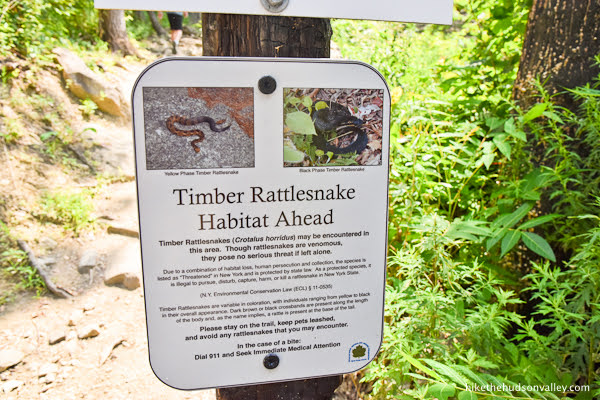
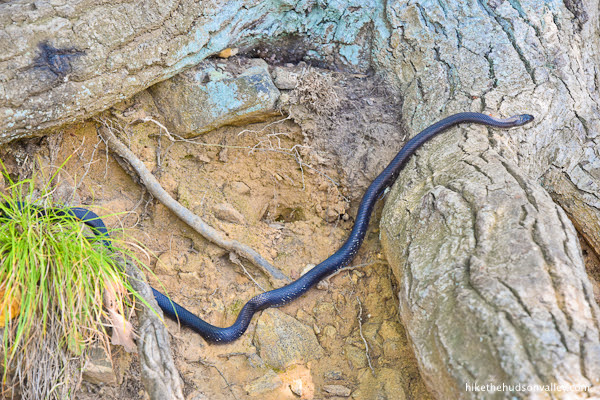
(Incidentally, the risk of getting bitten by a rattlesnake is so small as to be functionally non-existent. I documented everything I could find about venomous snakes in the Hudson Valley in this blog post — Snakes on a trail — in case you like to obsess on this topic like I do. We didn’t see any timber rattlesnakes on our most recent Breakneck hike, but we did see a cute little cricket-muncher of a black snake.)
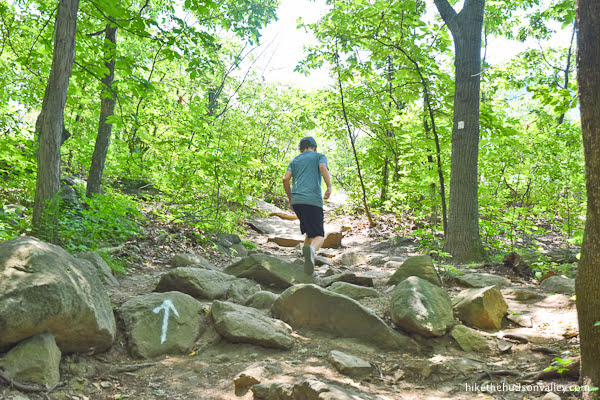
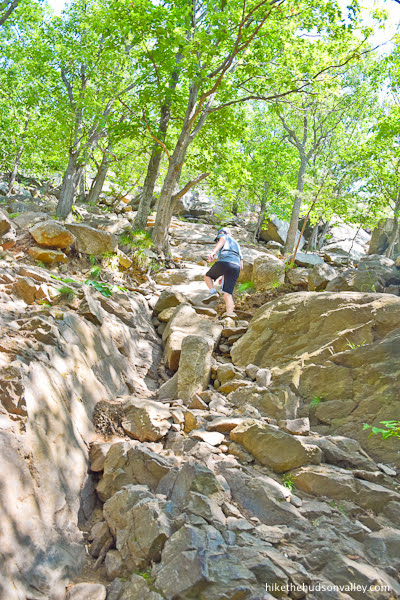
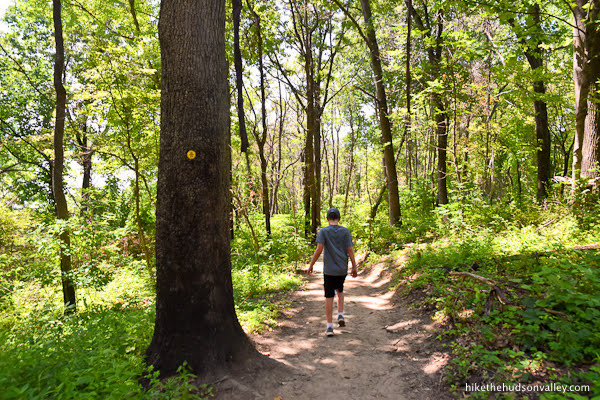
4. Onward and upward! The trail markings here are copious, but you do need to keep a sharp eye out for them. This area has taken a beating from overuse, with many tromp-trails that could lead you astray if you weren’t paying attention. It’s better for you (and for the sustainability of this area) if you stay on the designated trail the whole way up – make sure you’re constantly playing a game of “Find the Next Blaze!” and you’ll be all set.
5. Less than five minutes from the start, you’ll arrive at some warning signs that will ask you if you’re sure you really want to do this.
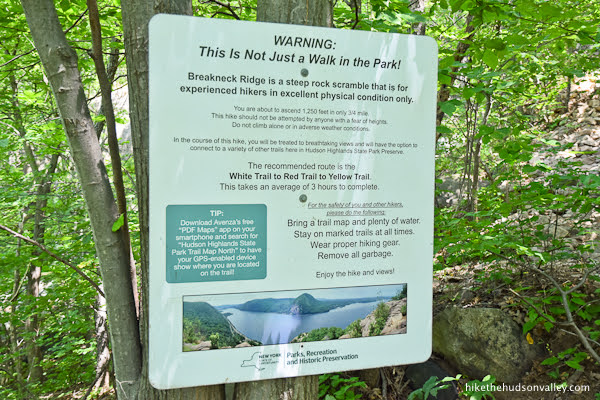
“WARNING: This is not just a walk in the park! Breakneck Ridge is a steep rock scramble that is for experienced hikers in excellent physical condition only.”
EXCELLENT physical condition? I mean, if I had to fill out a questionnaire that asked me to rate my physical condition, I might fill in the bubble a notch or two below “excellent.” Very good? Fair? Custard-filled?
In any event, if you choose to walk past this sign, feel free to tell everyone that you are in EXCELLENT physical condition (assuming you make it out of here in one piece).
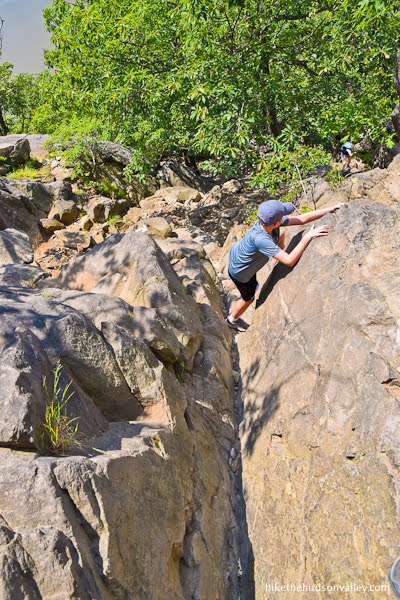
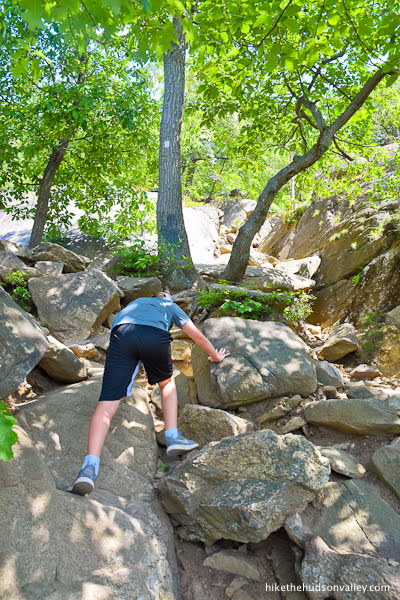
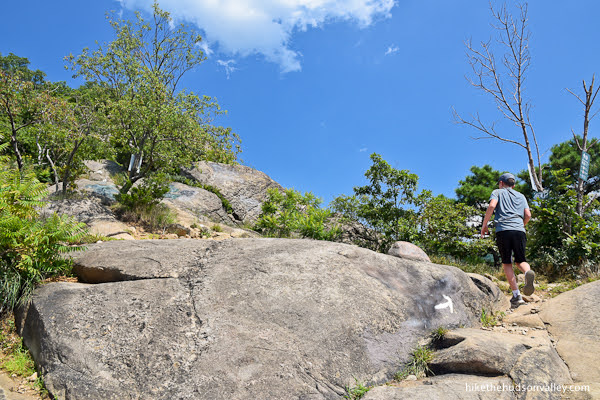
6. Just beyond those signs, keep following those white arrows. When the arrows point directly up, they are not lying. Just about 500 vertical feet from here to the flagpole – you could do that walking on your hands, right? Actually, that’s kind of what you’re about to do.
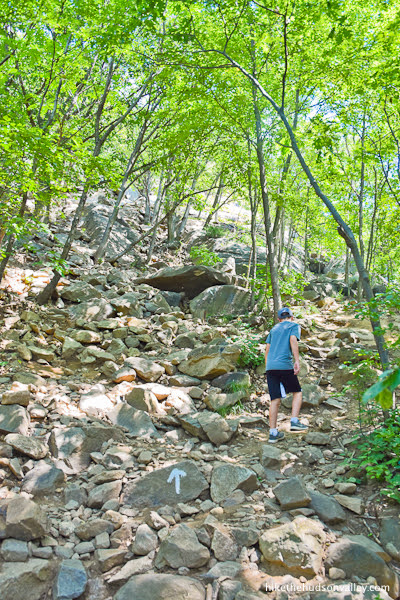

From the “Excellent Physical Condition” sign to the flagpole took us 28 minutes, stopping often for water breaks, during which I repeatedly questioned why I lied about my physical condition by continuing up this trail.

One benefit of this near-vertical trail: in less than ten minutes, you already have views! Don’t forget to look at them! (They’re behind you.)

Keep climbing!
And looking at the views!
And climbing some more!

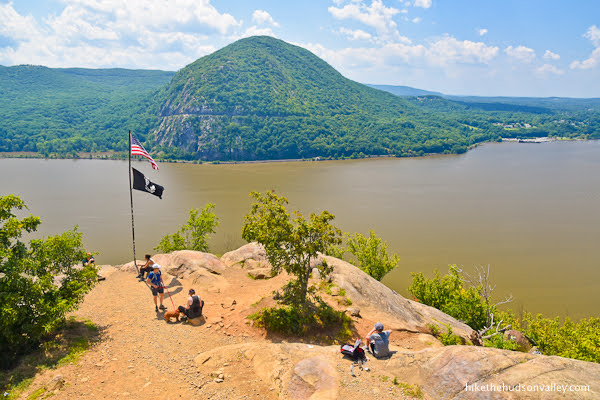
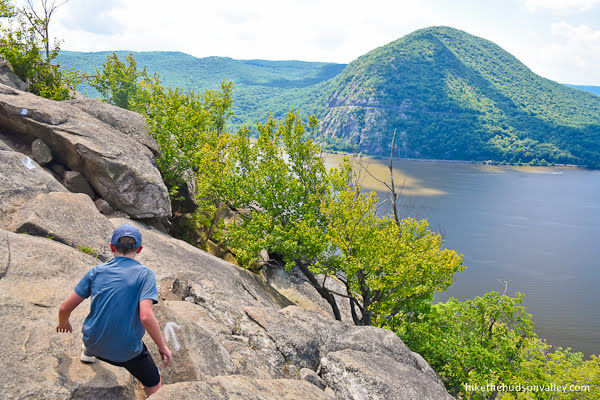
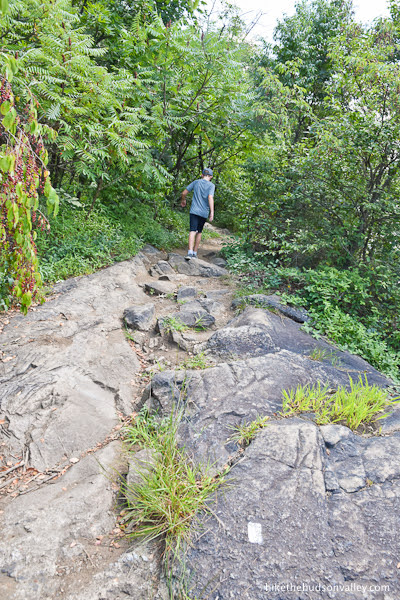
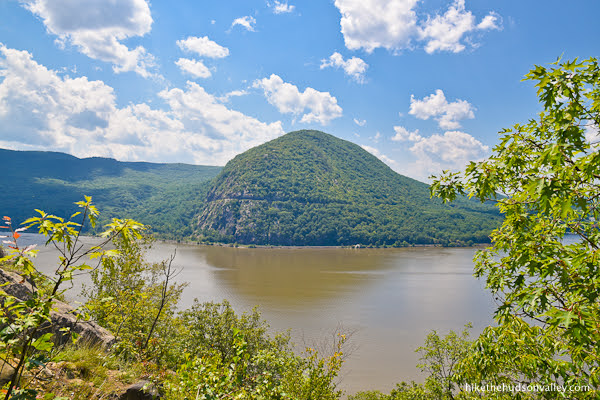
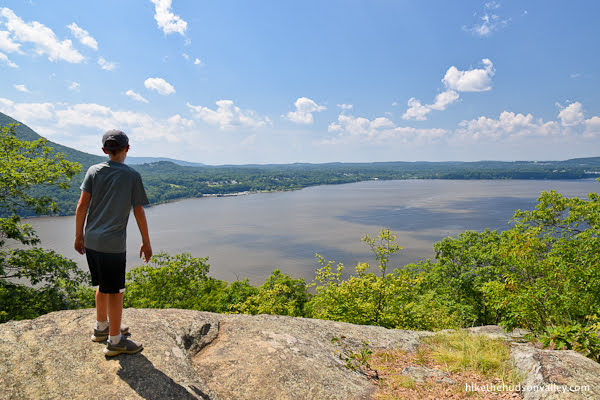
7. About 26 minutes past the “EXCELLENT PHYSICAL CONDITION” sign (at which you clearly did not lie, because you have made it this far), you’ll emerge onto a rocky clearing with excellent views of Storm King Mountain and the Hudson River.

From here, just one more steep climb up to the flagpole. There it is! You got this.

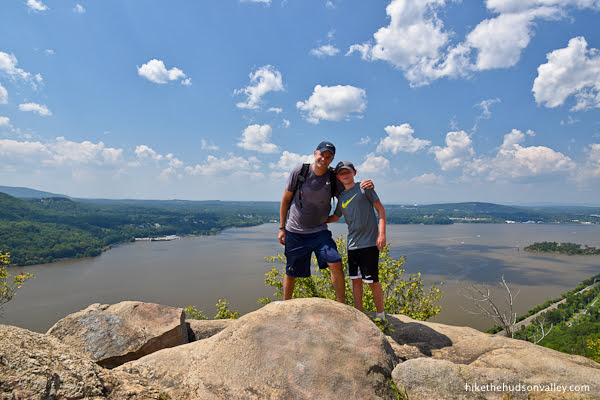
8. Finally, after the longest .4 miles of your life, you’ll emerge onto the bluff with the flagpole and that famous view.
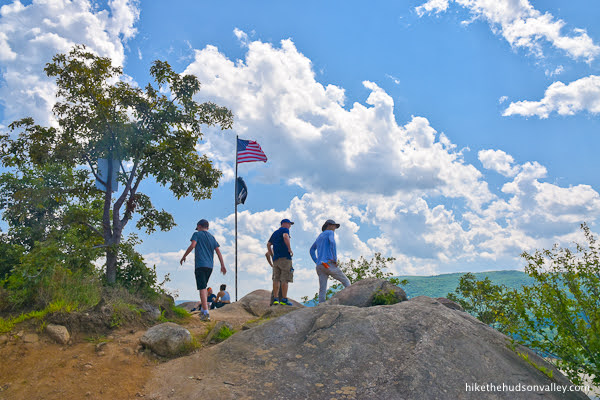
Find a spot to take a seat (you’ll likely have some company up here) and take it all in.

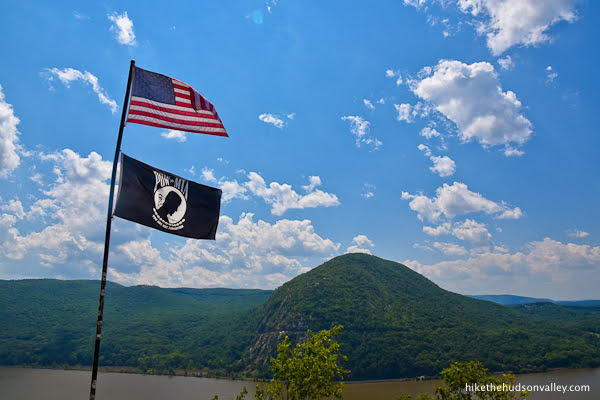
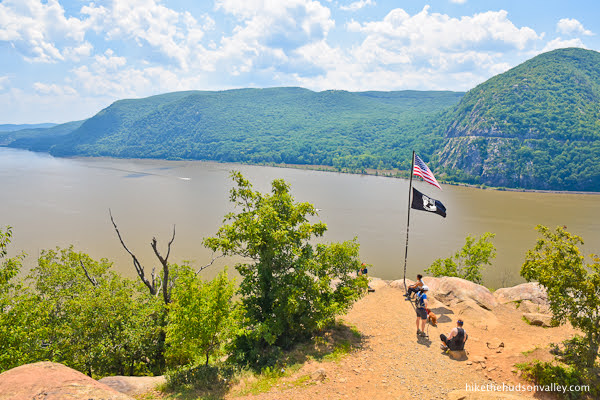
What an awesome place.

If your hiking partner is not too embarrassed to be photographed with you, grab a group photo quick, before they become a teenager! (One benefit of not having solitude up there is that you’ll likely find plenty of friendly folks willing to take a picture for you. Strangers: The original selfie sticks.)
9. When you’re done marinating your eyeballs in the view, time to keep climbing! Wait, we’re still going up? Yes, indeed, but just for a moment. Some not-so-subtle signage reminds you that climbing down the rock scramble is not an option.
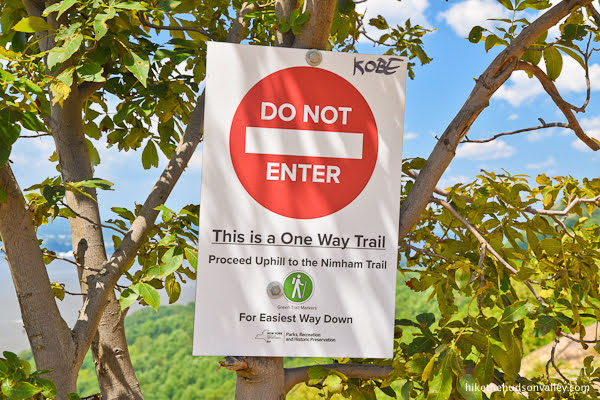
Up we go! Again!
Keep following those white blazes uphill from the flagpole. In just one minute (though it might feel like longer), you’ll arrive at the well-marked junction with the green-blazed Nimham Trail.
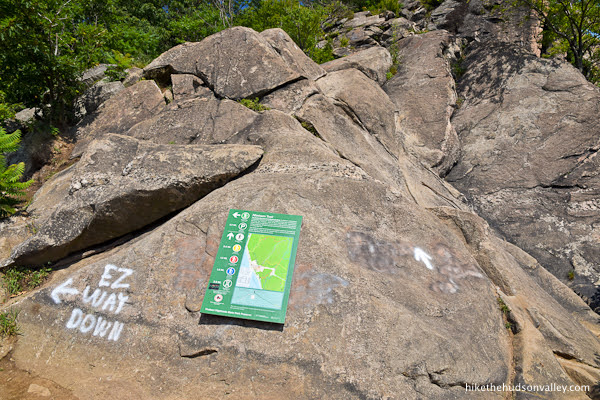
EZ WAY DOWN? Yes, please! Turn left here to follow the green blazes of the Nimham Trail back down the mountain.
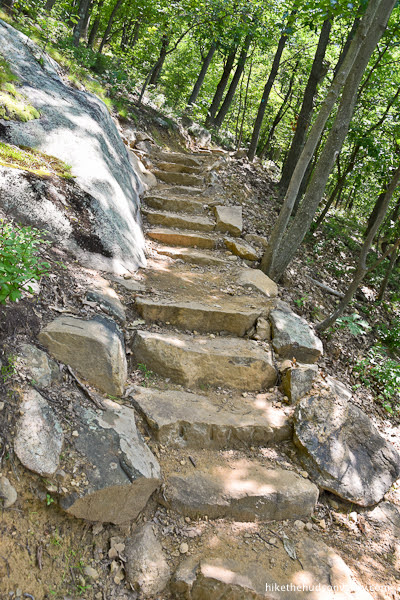
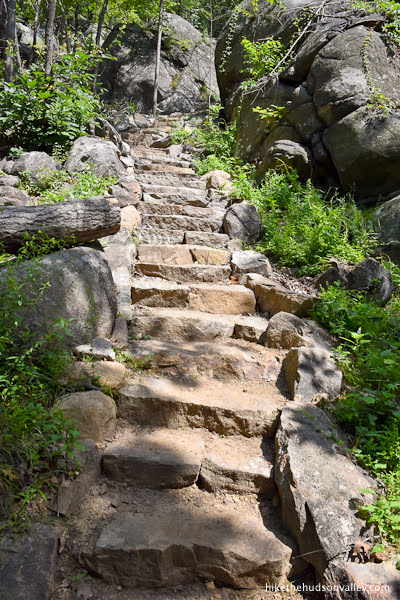
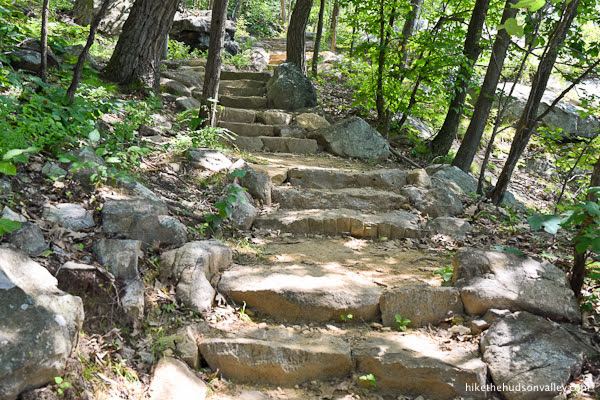
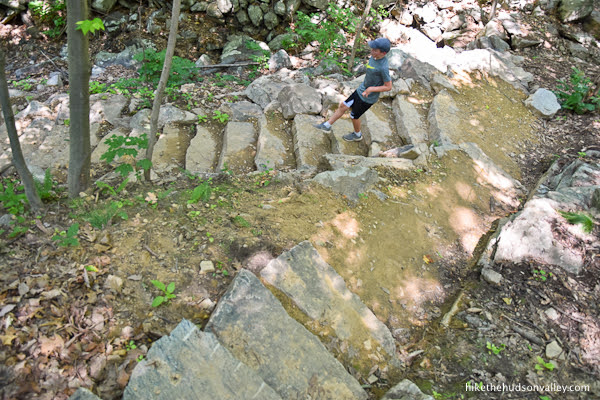
10. It took us about 15 minutes to descend the Nimham Trail, stopping along the way to admire the awesome trailwork.
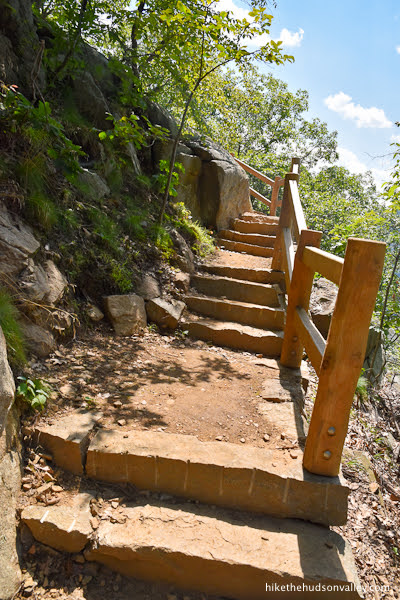

As you stroll down these steps, here are some stats to consider from the NYS Parks article on this trail:
With each stone step weighing an average of about 500 pounds, that’s more than a quarter-million pounds of stone, cut in place from boulders near the trail, and moved through muscle power aided by block and tackle, come-alongs and highlines, and set into place, with much of the work done by hand. The steps are a legacy as durable as the mountain itself.
Wow. Such amazing work. How many millions of calories were spent building these steps?
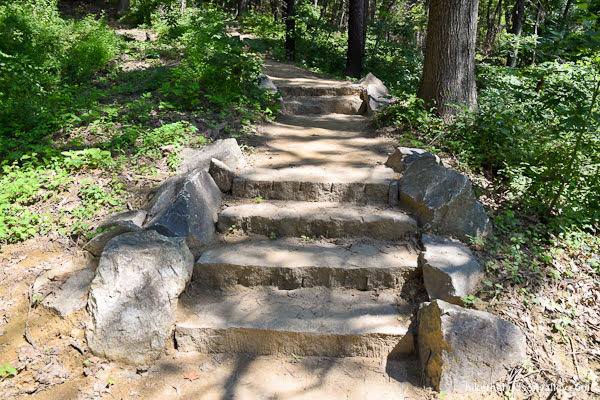
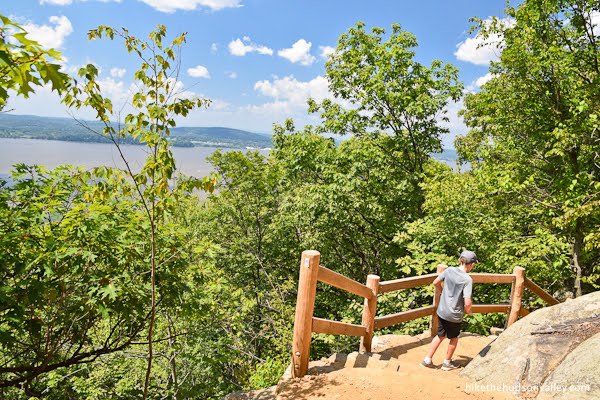
Less than ten minutes down the Nimham Trail, you’ll notice a little spur to your left.
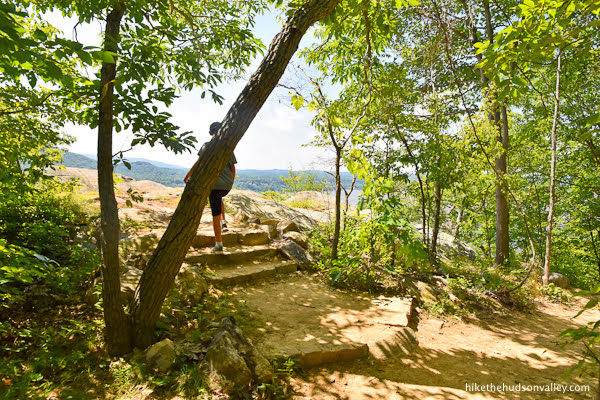
Hop up those stone steps to gain one last gorgeous view for the day. Prior to 2021, this viewpoint wasn’t part of the trail system here. Thanks, Nimham Trail!

Say goodbye to the view, then continue your descent. From that view, it’s about another ten minutes to the end of the Nimham Trail, traversing more impressive stonework and a picturesque little bridge.

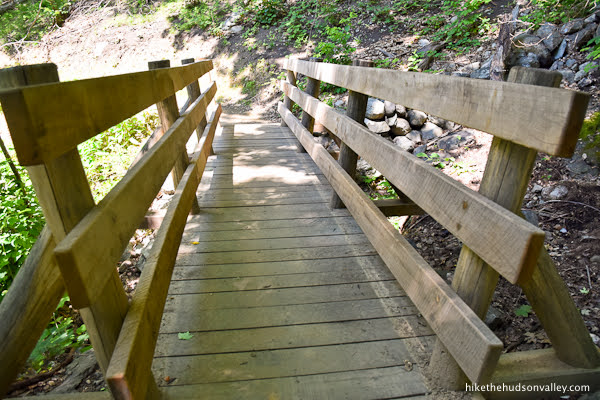
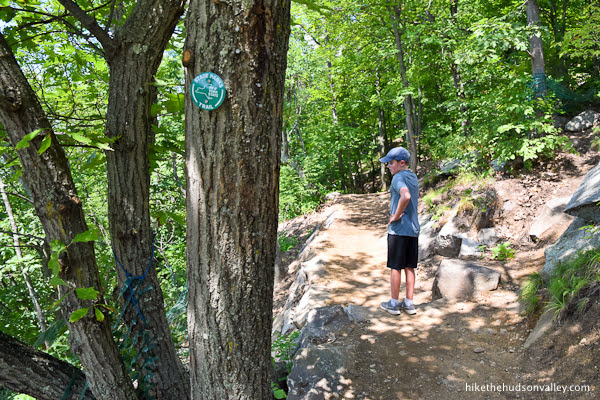
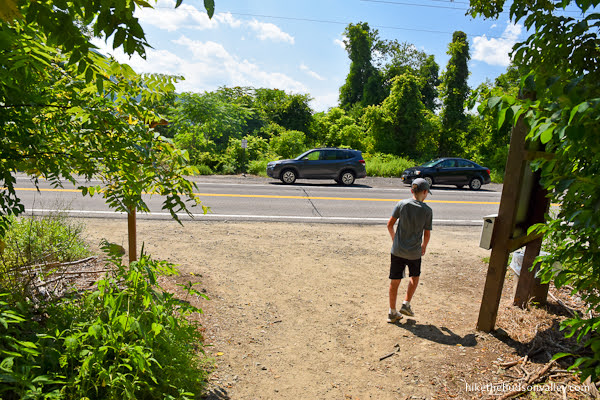
11. One minute after the wooden bridge, you’ll arrive at a trail junction where the Nimham Trail dead-ends into the yellow-blazed Wilkinson Memorial Trail (heretofore referred to as the Yellow Trail).
Turn left here to follow the Yellow Trail back to Route 9D, which you’ll reach in five minutes or less.

12. Enjoy the relative flatness of the Yellow Trail as it brings you back to civilization.
Take a moment to ogle your last stone steps of the day (unless you decide to do the loop again).

In just a minute, bam! You’re back on Route 9D, at the start (or end, depending on your perspective) of the yellow-blazed Wilkinson Memorial Trail, with the tunnel and Breakneck Ridge trailhead .4 miles to your left (barely visible from here).

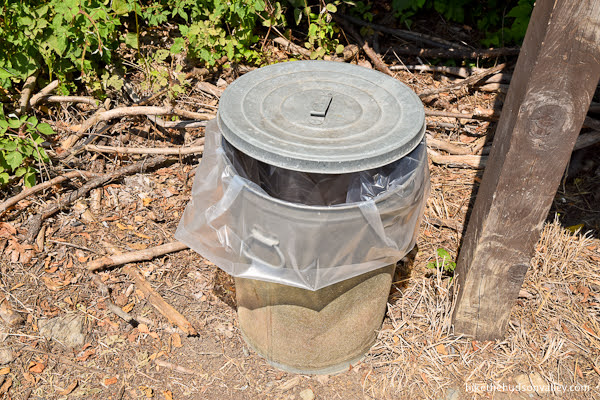
Hey, look, there’s a convenient trash can here, where you can deposit all the litter you picked up during your hike! This hike has all the amenities.
Remember where you parked? Good! Carefully make your way back to your vehicle along the heavily trafficked Route 9D, being careful not to make a speed bump out of yourself.
And that’s it! Hope you enjoyed your hike today. If you’re wishing the hike was a little longer, feel free to go around again! If you’re a sane person, though, the next order of business is to find some post-hike pizza. Let’s get to it!
Directions
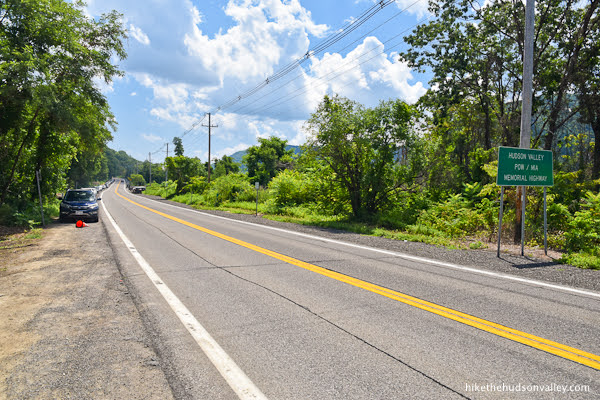
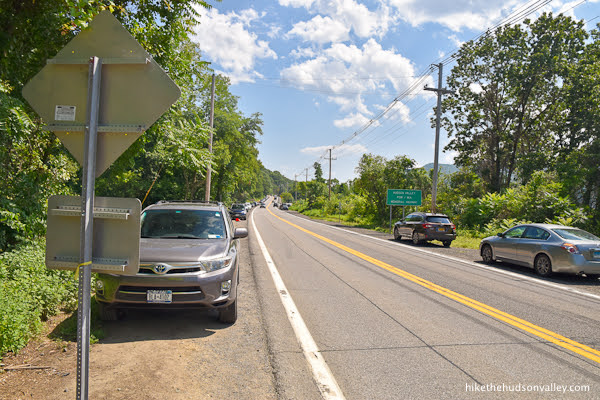
Directions to the trailhead: From the center of the village of Cold Spring, head north on Route 9D for about 2 miles. Once you go through the tunnel (the trail itself goes up and over the tunnel), look for parallel parking along the street.
This loop hike encompasses the .4 miles of Route 9D between the tunnel and the yellow-blazed Wilkinson Memorial trailhead to the north, which is marked with plenty of signage and blazes.
While it’s tempting to park close to the tunnel, I prefer to park closer to the Wilkinson Memorial trailhead, so that there’s less road walking to do at the end of the hike. Better to go ahead knock it out in the beginning! But either way works.
Here’s the view looking south, back toward the tunnel and Breakneck trailhead, with cars lining both sides of the street on a pleasant (but hot!) July Friday afternoon:
Lots of cars, but still plenty of spots! You won’t find this many open spots on a nice weekend day. Much better to visit at an off-peak time if you can.

Wherever you can find a legal spot, put on that turn signal, show off those parallel parking skills by doing it on the first try, carefully hop out, and let the adventure begin! Let’s go break some necks!
GPS coordinates of parking area: 41.44327, -73.97801 (Clicking will open in Google Maps or the Apple Maps app, depending on your browser/device.)
Resources & Interactives
Super-cool Google Earth flyover of hike route:
Google Terrain Map of hike route:
Related resources: If you’re looking for actual facts and/or useful information, visit these resources:
- The NYS Parks press release on the opening of the Nimham Trail
- This extremely informative article from the NYS Parks blog: Ninham’s Journey: Hard Tale and a Mountain Trail in the Hudson Valley
- Good info from the NY-NJ Trail Conference: Protecting North America’s Most Popular Hiking Destination
- My trail guide for the 3.7-mile Breakneck Ridge: Long Loop
Want to support trails in the Hudson Valley? Here’s one great way: Visit the New York-New Jersey Trail Conference homepage and click on Volunteer, Donate, or Shop! (Then you can volunteer, donate, or shop, depending on your mood.)